by utilising one global object forn the camera, which avoids many invisible internal opencv problemms |
||
|---|---|---|
| application | ||
| images | ||
| .gitignore | ||
| README.md | ||
| requirements.txt | ||
| run.py | ||
| tempstream.py | ||
README.md
Gesichtserkennung Demo
Quick Start
In diesem Abschnitt finden Sie alle nötigen Informationen zum schnellen Deployen der Applikation.
Anforderungen
- Python 3.x
- pip (für Python 3)
Deployment
ohne CUDA
pip install -r requirements.txt
python run.py
mit CUDA
original stackOverflow Antwort:
https://stackoverflow.com/questions/49731346/compile-dlib-with-cuda/57592670#57592670

Install Intel Performance Library: https://software.seek.intel.com/performance-libraries
Install cuDNN: https://developer.nvidia.com/cudnn

pip install cmake
git clone https://github.com/davisking/dlib.git
cd dlib
git submodule init
git submodule update
mkdir build
cd build
cmake  -D DLIB_USE_CUDA=1 -D USE_AVX_INSTRUCTIONS=1 ../
cmake --build . --config Release
cd ../
python setup.py install
cd ../

pip install -r requirements.txt
python run.py
Konfiguration
Die Konfigurationsdatei finden Sie im Ordner "application".
In ./application/config.py können Sie die relevanten Parameter konfigurieren.
# Database config
databaseFile    = "./test.sqlite"
echoDatabase    = False

# Web Server config
debug           = True
port            = '5001'

# Face recognition config
model           = "hog" # hog or cnn
tolerance       = 0.6
useCUDA         = True
videoSource     = "http://192.168.178.56:8080/video"
scaleInput      = 0.5
Video Source kann eine Videodatei, ein live stream oder eine Webcam sein:
https://opencv-python-tutroals.readthedocs.io/en/latest/py_tutorials/py_gui/py_video_display/py_video_display.html#goal
Nach dem erfolgreichen Deployment sollte es wie folgt aussehen:

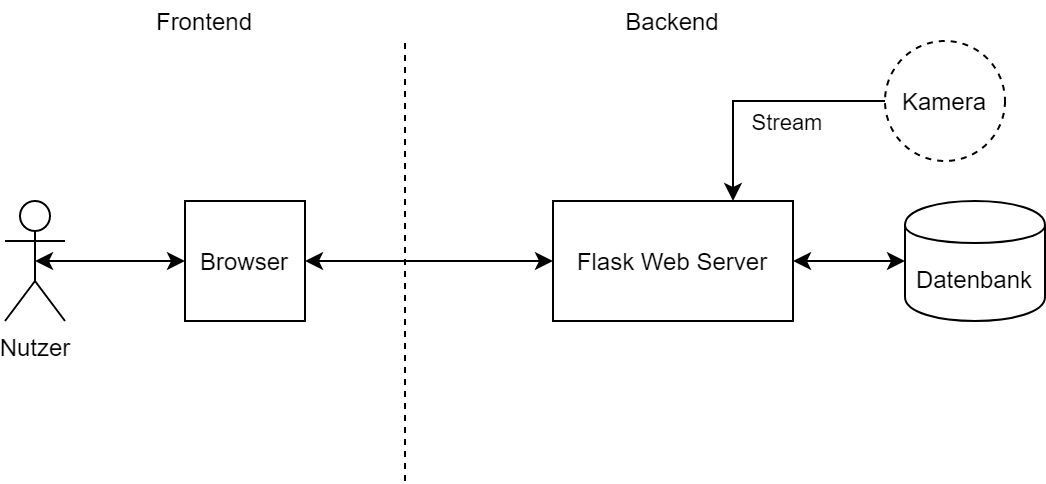
Komponenten
Die Applikation nutzt Client seitiges rendern mit JS Templateing.
Serverseitig wird nur die Grundlegende Struktur, das Gerüst sozusagen gerendert.
Das Backend besteht aus 3 Komponenten:
- Kamera
- Server
- Datenbank
Komponentendiagramm:
API
Die API ist RESTful, besitzt 2 Endpoints mit dem Präfix /api/v1.
Struktur:
/person/id?useFace
    POST:
        legt neues Person Objekt an
    GET:
        Parameter:
            id: URL Parameter, id des gesuchten Objektes, optional
            useFace: Query Parameter, letztes gespeicherte Bild wird zum identifizieren genutzt , optional

                Get: wenn nur id gesetzt ist
                Verifizierung: wenn id und useFace gesetzt sind
                Identifizierung: wenn useFace gesetzt ist

    PUT:
        disabled
    DELETE:
        Löscht Objekt per ID

/camera/type
    POST:
        speichert den aktuellen Frame
    GET:
        type - still (default): gibt letzten gespeicherten Frame
        type - stream: gibt einen mjpeg Video Stream aus, welcher als Bild eingebettet werden kann
        type - processed: mjpeg Video Stream mit umrandeten Gesichtern und eingezeichneten Namen
    PUT:
        disabled
    DELETE:
        disabled
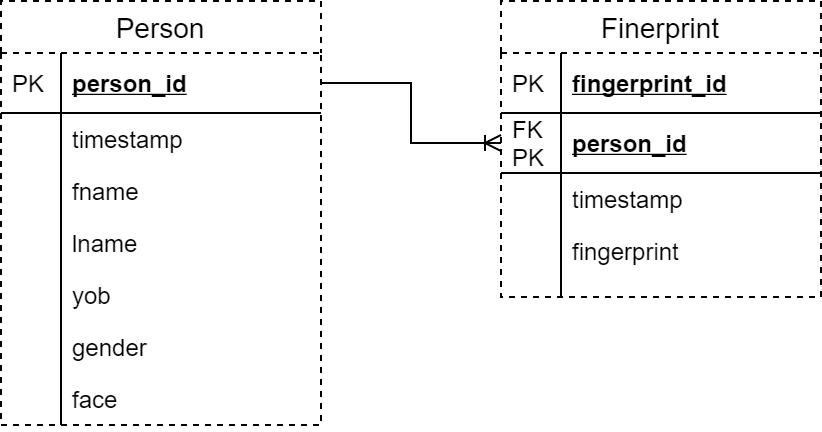
Datenstruktur
Für den Datenbankzugriff wird der ORM SQLAlchemy genutzt.
Es existieren Personen und Fingerabdrücke mit einer 1:N Beziehung.
Fingerabdrücke werden momentan ignoriert.
Datenbankstruktur